Natural Language Inference#
This page walks a complete fit through PyAutoFit and autofit_assistant as a conversation, and shows why PyAutoFit’s named models, separate likelihood, interchangeable searches and structured results make this workflow well suited to AI agents. If you have not set the assistant up yet, start with Quick Start.
Every step on this page can be requested in natural language—you do not need to write Python to follow it. The workflow is: model → priors → likelihood → search → results → scientific workflow. Typing the start-here prompt from Quick Start into the assistant walks these six sections as a guided tour, one step at a time — or you can paste any prompt below into the assistant directly.
Contents#
Compose the Model: Describe model components and assign priors to named parameters.
Define the Likelihood: Specify how the model is compared with your data, or supply existing likelihood code.
Searches: Choose between nested sampling, MCMC and optimisation.
Model Fit and Results: Run a fit, inspect parameter estimates and uncertainties, and plot the fitted model.
Saving and Loading: Save results and images during fitting, then reload completed runs for further analysis.
Scientific Workflows: Compose more complex models, compare inference algorithms and investigate saved results.
Example#
We will fit a 1D Gaussian profile to noisy data and infer its centre, normalization and width. The data points and their uncertainties are shown below:
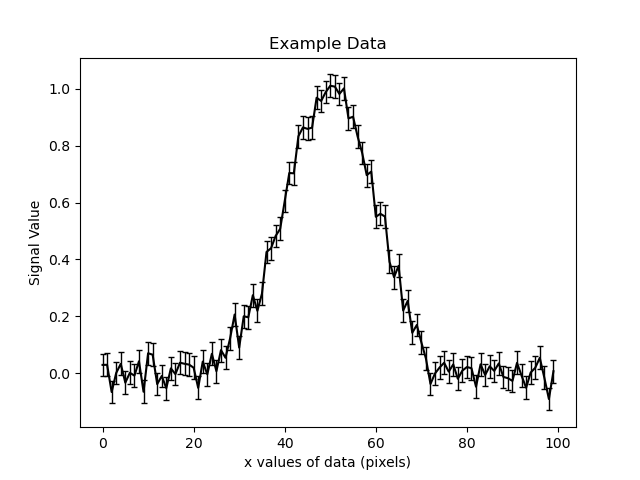
For the assistant’s bundled dataset, the profile is:
Here, \(x\) is the coordinate, \(c\) is the centre, \(N\) is the normalization (the peak amplitude in this example), and \(\sigma\) is the width. Our task is to infer \(c\), \(N\) and \(\sigma\) from the data, together with their uncertainties.
Compose the model#
Create a 1D Gaussian model with free centre, normalization and sigma. Use uniform priors from 0 to 100 for centre, 0 to 100 for normalization, and 0.1 to 30 for sigma. Show me the model and its priors.
This specifies a model with three free parameters:
Total Free Parameters = 3

model                         Gaussian (N=3)

centre                        UniformPrior [0], lower_limit = 0.0, upper_limit = 100.0
normalization                 UniformPrior [1], lower_limit = 0.0, upper_limit = 100.0
sigma                         UniformPrior [2], lower_limit = 0.1, upper_limit = 30.0
Models are highly customizable: you can ask to fix a parameter, link parameters between components, or assert a constraint. For your own science, simply ask the assistant to compose your model for you.
AI First Design: Internally, PyAutoFit composes the model with a name (Gaussian), named parameters (centre, normalization, sigma) and an expressive naming convention (e.g. model.gaussian.sigma) which ensure the AI can easily map natural language descriptions of the model to changes in its internal representation.
Define the likelihood#
Load the 1D Gaussian data and noise map, define a likelihood function which uses independent Gaussian errors to compare the model with the data and for a random set of parameters calculate the likelihood. Produce an image comparing the fit to the data
The assistant sets up the likelihood function: which in this case evaluates the Gaussian at each data point and compares the predictions with the measurements, accounting for their uncertainties. As requested, you get an image comparing the model and data.
For your own project, you can instead ask:
Use my existing likelihood code for this analysis [point to code]. Connect it to PyAutoFit and check that it returns the same likelihood values at the same parameter values.
This is the job of the assistant’s BYOL mode, which wraps your existing likelihood unchanged and validates it.
AI First Design: PyAutoFit gives the agent a small, testable integration task: connect named model parameters to your existing likelihood and check that its numerical outputs are unchanged. Your validated science code then becomes available to PyAutoFit’s searches and result-analysis tools, without the agent having to reimplement it.
You can also give the assistant papers and descriptions of your data, parameters and assumptions. This supplies the scientific context so you can use domain-specific natural language while keeping it separate from the inference code.
Choose a search#
Show me the available non-linear searches, including those which support gradient based inference using JAX. For this example fit, our likelihood function is not implemented using JAX, so lets use Dynesty nested sampling with 100 live points to estimate the posterior and evidence.
PyAutoFit supports several types of inference algorithm:
Nested sampling: Dynesty and Nautilus, for posterior inference and Bayesian evidence estimation.
MCMC: Emcee and Zeus, for posterior sampling.
Optimisation: algorithms such as L-BFGS, for finding a best-fitting solution.
Gradient-based (JAX):
BlackJAXNUTSfor Hamiltonian / NUTS sampling, andMultiStartAdam/MultiStartProdigyfor optimisation. These take gradients of your likelihood automatically, so they require it to be written in JAX — which is why this example, whose likelihood is plain NumPy, uses Dynesty.
The assistant configures the requested search. You can ask it to explain the settings or help choose an algorithm for your likelihood and scientific goal.
AI First Design: All PyAutoFit searches share a common interface, so the agent can switch between them while retaining the model and likelihood, making it easy to compare inference across different searches.
Fit and inspect the result#
Run the model fit. Show the parameter estimates and uncertainties, and plot the maximum-likelihood Gaussian over the data.
The assistant runs the search and presents a summary of the inferred centre, normalization and width, together with their uncertainties and a plot of the fitted profile. You can then explore the result:
Plot the posterior distributions. How well is sigma constrained, and is it correlated with normalization?
AI First Design: Results preserve the model’s named parameters (e.g. result.instance.gaussian.sigma), so the agent can connect the scientific quantities you specify via language to the numerical results.
Save and revisit the analysis#
Save the run to disk, with fit and residual images updated during sampling. Afterwards, reload the saved samples and inspect the fit without rerunning it.
Ask to save results and visualization for before starting the fit and the assistant will ensure all results and output to hard-disk in a way designed for efficient human inspection.
Saved runs retain the model, search settings and sample information, alongside the domain and model specific visualization you request. At scale, results can also be collected into a database and queried by dataset metadata, search, model or result properties. For example:
Find the completed Gaussian fits and make a table of the inferred widths and their uncertainties, labelled by dataset and search algorithm.
AI First Design: Structured, persistent outputs give the agent a history of experiments it can reload, query and compare as your analysis grows.
Extend the workflow#
The same building blocks support more involved requests:
Fit three Gaussians
Extend the model to three Gaussians and sum their profiles in the likelihood. Assert that their centres are in ascending order, show me the priors, perform inference with Dynesty again and compare the Bayesian evidence with the single-Gaussian fit.
The assistant builds a model with three named components and reports the Bayesian evidence comparison under the stated priors.
Compare inference algorithms
Fit the same model using Emcee, Dynesty and an optimiser for maximum likelihood estimation. Keep the likelihood and parameter bounds fixed, and use the same priors for both samplers. Compare runtime, likelihood evaluations and best-fit values. For the samplers, also assess convergence and agreement of posterior constraints.
This produces a comparison for your likelihood and computing environment, making it easy to work out which inference method is fastest and which ones successfully find the best-fit reliably.
Investigate a saved result
Load the saved Gaussian fit. Report the median and 68% credible interval for sigma, plot its correlation with normalization, and inspect the residuals for structure the model may have missed.
The assistant uses saved samples and the original data to reinspect an already completed fit.
Scientific Context#
PyAutoFit is domain agnostic: you bring the scientific context. The assistant ships with a statistics wiki
covering Bayesian inference, priors, searches and model comparison. Its literature wiki at wiki/literature/
is yours to populate with the papers that define your field and analysis.
Adding papers lets the assistant connect your natural language scientific descriptions to its inference: what parameters mean, which assumptions are conventional, how previous studies approached the problem, and what might complicate the interpretation of a result.
To add a paper, simply ask:
Ingest this paper into the literature wiki: [arXiv ID, link or local PDF]. Summarise its model, likelihood, priors and main conclusions, and explain how it relates to the analysis we are developing.
The wiki builds a lasting reference for your project, so scientific context is available alongside your code and results. As you add relevant papers, the assistant can draw on them to frame decisions, cite prior work and identify caveats worth investigating.
What Next?#
I now recommend you install the autofit_assistant, have it perform inference on a topic within your scientific domain and experiment with what it can do.
If you find you start doing larger more complex modeling tasks, you may quickly find you have more results than you can manage and inspect. At this point, you should setup a PyAutoFit Scientific Workflow, with this page describing advanced tools that make inference scalable and the inspection of results fitting to large datasets feasible.
PyAutoFit also supports many advanced Statistical Methods not mentioned here. This includes hierarchical models to large dataset, building inference pipelines combining different searches by chaining them together, and Bayesian model comparison. You can ask the assistant to describe each feature and then perform inference using the same natural-language approach.
HowToFit / Teacher Mode#
For users less familiar with Bayesian inference and scientific analysis you may wish to read through the HowToFits lectures. These teach you the basic principles of Bayesian inference, with the content pitched at undergraduate level and above.
The lectures are available in the standalone HowToFit repository.
If you’re new to statistical inference and are not totally sure what concepts like a model, likelihood or sampling are, you can use teacher mode to have the assistant explain concepts in more detail. Simply start a prompt with “Teacher mode.” and ask questions:
Teacher mode.
I’m new to PyAutoFit and want to learn the basic workflow end-to-end. Fit the bundled 1D Gaussian dataset in dataset/gaussian_x1/ and recover its input parameters.
Explain what each step is doing and why as we go: composing the model, choosing the priors, picking the non-linear search, and how to read the posterior. So I come away understanding the workflow, not just the commands.
The Python API#
Checking The Python API to see the actual underlying PyAutoFit Python API which implements the inference performed through natural language above.
The autofit_workspace provides human readable, runnable examples for everything PyAutoFit. These examples are the basis on which the autofit_assistant is trained, and what allows it to do complex inference tasks through natural language. For you as a scientist, reading through these guides can help build understanding of how inference actually works.